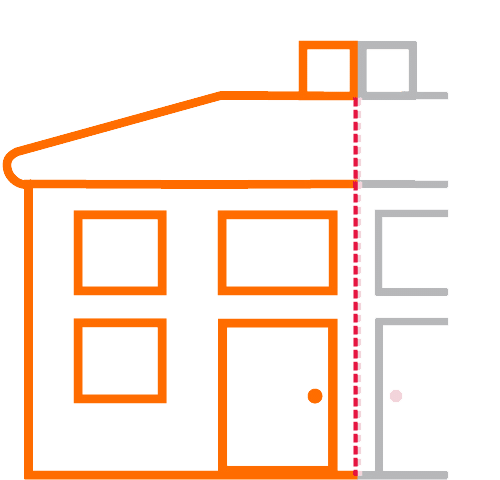
You shouldn't push loft insulation directly against the eaves, as this can block essential ventilation and create moisture problems. Instead, maintain a minimum 25mm gap between the insulation and eaves to guarantee proper airflow while maximizing thermal efficiency. While the recommended insulation depth is 270mm throughout the loft, proper installation near the eaves requires careful attention to prevent condensation and mold growth. Professional installation can help achieve ideal coverage while preserving ventilation, potentially saving you up to £445 annually on energy bills. Understanding the balance between insulation coverage and ventilation reveals important considerations for your home's thermal performance.
Understanding Eaves Insulation
Table of Contents
ToggleManaging eaves insulation correctly stands as an essential element in achieving best thermal efficiency for your home.
When you're insulating your loft, you'll need to guarantee the material extends properly to the eaves, as this vital area often becomes a weak point for heat loss if not adequately addressed.
You'll want to aim for the government-recommended depth of 270mm throughout your loft space, including the areas approaching the eaves.
This consistent coverage helps create an effective thermal barrier that prevents cold spots and maintains comfortable temperatures throughout your home.
While you're working to maximize insulation coverage, it's imperative that you don't block the ventilation paths at the eaves, as proper airflow remains essential for preventing moisture-related issues.
Benefits of Full Coverage
While many homeowners focus on basic loft insulation, extending coverage fully to the eaves delivers considerable financial and practical benefits.
You'll notice an immediate impact on your energy bills, with potential savings of up to £445 annually when you guarantee complete coverage to the edges of your loft space.
Beyond the financial advantages, you're creating a more efficient and healthier living environment.
When you extend insulation to the eaves, you're preventing cold spots and condensation that often lead to dampness and mold issues, which can greatly affect your home's air quality.
You'll also find that your heating system performs more effectively, as the consistent temperature throughout the loft space reduces strain on your boiler and extends its operational life.
There's a compelling investment angle too, as proper eaves insulation can increase your property's value by up to 16%.
When you install the government-recommended 270mm thickness right up to the eaves, you're not just meeting building regulations – you're maximizing your home's thermal efficiency and creating a more comfortable living space that maintains its value over time.
Risks and Safety Considerations
The risks associated with extending insulation to your eaves demand careful attention and proper planning. When you're contemplating pushing insulation all the way to the eaves, you'll need to carefully weigh several critical safety factors that could affect both your home's integrity and your family's health.
One of your primary concerns should be moisture management, as trapped moisture can lead to condensation and subsequent mold growth, which will negatively impact your indoor air quality.
You'll also need to reflect on the essential role of ventilation, as blocking airflow pathways can create serious problems with temperature regulation in your loft space. If you're not careful, you might find that blocked vents actually reduce your insulation's effectiveness, potentially leading to increased energy costs rather than the savings you're hoping to achieve.
Before proceeding with any installation, you'll want to verify compliance with current building regulations, as improper installation can create safety hazards and potentially affect your property's value.
It's highly recommended that you obtain a professional assessment of your specific loft conditions, as this will help guarantee that your chosen insulation methods don't compromise your home's structural integrity or safety standards.
Best Installation Practices
Since proper installation techniques directly impact your insulation's performance, following industry-proven best practices will help you achieve ideal results.
When extending insulation to the eaves, you'll need to maintain the government-recommended minimum thickness of 270mm while guaranteeing proper ventilation pathways remain unobstructed.
To maximize thermal efficiency, you should carefully push the insulation material up to the eaves, but don't compress it, as this reduces its effectiveness.
It's vital to incorporate breathable membranes during installation, which allow moisture to escape while maintaining thermal protection.
You'll want to pay particular attention to draught-proofing around the eaves and roof edges, as these areas are prone to cold air infiltration that can compromise your insulation's performance.
When you're working in the loft space, create a systematic approach to guarantee complete coverage, particularly in those hard-to-reach areas near the eaves.
Remember that proper airflow is critical for preventing condensation buildup, so you'll need to maintain adequate ventilation gaps while still achieving extensive insulation coverage.
This balanced approach will help you create an energy-efficient loft space that meets current building standards while preventing moisture-related issues.
Ventilation Requirements
Maintaining proper ventilation alongside insulation stands as a critical requirement for any loft space. You'll need to make certain that air can flow freely through your eaves to prevent the damaging effects of condensation and moisture buildup, which can compromise both your insulation's effectiveness and your home's structural integrity.
When you're installing loft insulation, you must maintain a minimum 25mm ventilation gap at the eaves. This space isn't wasted—it's essential for creating proper airflow that helps regulate temperature and moisture levels throughout your loft.
If you're thinking about pushing insulation right up to the eaves, you'll want to reconsider, as this can trap moisture and ultimately lead to reduced insulation performance and increased energy costs.
To achieve the best balance between thermal efficiency and ventilation, you'll need to incorporate breathable membranes or vents alongside your insulation at the eaves.
Building regulations specifically emphasize maintaining eaves ventilation during insulation installation, and you shouldn't overlook this requirement.
Material Selection Guide
Proper ventilation sets the stage for selecting the right insulation materials for your loft space.
When you're choosing insulation, you'll need to focus on materials with high thermal resistance, commonly known as R-value, with mineral wool and fiberglass being top contenders for effective heat retention.
You'll want to evaluate moisture management carefully, as it's vital for maintaining insulation effectiveness. While closed-cell spray foam provides excellent moisture resistance, you might need to add vapor barriers if you're using blanket insulation.
The thickness of your chosen material should meet building regulations, typically around 270mm, which offers ideal energy efficiency while keeping costs reasonable.
For areas that are difficult to access, you'll find lightweight options like blown-fibre or loose-fill insulation particularly useful, as they can be effectively pushed up to the eaves without compromising their structure.
If environmental impact is a priority for your project, you should explore eco-friendly alternatives such as cellulose or sheep's wool, which don't just provide effective insulation but also contribute to better air quality in your living space.
These sustainable options deliver comparable performance while minimizing your carbon footprint.
Common Installation Mistakes
Over the years, one of the most frequent mistakes homeowners make is cramming insulation tightly against the eaves. This common error can lead to serious consequences, as blocking the ventilation paths prevents proper airflow and creates conditions ripe for moisture accumulation.
You'll find that when insulation is packed too densely in these areas, you're not only risking mold growth but also potentially violating building regulations.
Another critical mistake you'll want to avoid is disregarding manufacturer guidelines regarding insulation thickness and installation methods. When you don't maintain proper spacing at the eaves, you're creating cold spots that compromise the insulation's thermal performance.
The effectiveness of your insulation system depends on maintaining consistent coverage while ensuring adequate ventilation throughout the loft space.
To prevent these issues, you'll need to leave sufficient gaps between the insulation and eaves to allow for proper air circulation. This approach isn't just about following regulations; it's about protecting your investment and ensuring your insulation performs as intended.
Professional Vs DIY Approaches
When deciding between professional installation and DIY approaches for loft insulation, several key factors come into play. If you're considering DIY, you'll benefit from cost savings on labor and personal satisfaction from completing the project yourself.
However, you'll need to thoroughly understand safety protocols and building regulations to guarantee proper installation of the recommended 270mm insulation thickness.
Professional installers bring specialized expertise that's particularly valuable when dealing with complex situations. They're trained to identify potential issues, such as proper ventilation needs in the eaves, which helps prevent condensation and mold growth.
You'll also benefit from their knowledge of safety considerations, especially regarding asbestos in homes built before 2000. When pushing insulation up to the eaves, professionals understand how to maintain ideal thermal performance while guaranteeing adequate airflow.
While both approaches can achieve effective results, your choice should depend on your experience level, comfort with heights, and understanding of building requirements.
If you're confident in your abilities and willing to research thoroughly, DIY can be rewarding. However, if you want thorough safety checks and guaranteed compliance, professional installation might be your better option.
Cost and Value Analysis
Investing in loft insulation that extends to your eaves offers compelling financial benefits.
You'll notice immediate impacts on your energy bills, with potential annual savings of up to £445, making it a practical solution for managing household expenses. While the initial costs, starting at £7.99 per roll for blanket insulation and potentially reaching £395 for full installation, might seem substantial, you'll find the investment pays for itself within a few years.
The financial advantages don't stop at energy savings. You'll see a significant boost in your property's market value, as energy-efficient improvements can increase your home's worth by approximately 16%.
If you're concerned about the upfront costs, you'll be pleased to know that various support options exist, including the ECO scheme, which can provide full funding for eligible households.
When you calculate the long-term benefits, you'll realize that the annual savings of £120 to £225 make this a financially sound decision.
The combination of reduced energy bills, increased property value, and available funding assistance creates a compelling case for extending your loft insulation to the eaves.